One of the first things I learned when I started to work was how to debug.
While studying I just run the program (F5 in visual studio) and hit some breakpoints when needed. I could play with the order of execution, go back and re-run, change some values on the fly and more. I didn’t need anything else and it simply worked.
When doing “real” stuff, i.e. not homework stuff, there are more things that need to be taken into account. What OS the user has, what type of framework does he have installed and more.
Moreover, you can’t deliver a product and excuse the bugs saying “it works on my machine”

Thus, the best way to really test your program, is to test it on the user’s environment – obviously you can’t do that, so VM is the key.
Virtual Machine (VM) it’s a concept that allows you to execute a whole OS on top of yours. There are many products in the market that allow you to do it, I use VMWare. (I wrote a post about how awesome it is).
Here is a recipe on how to configure everything you need to be able to debug your code on top of a VM.
Required software
- Visual Studio (any version will suffice)
- VMWare Workstation
- Any version of Windows installed as a VM in VMWare.
Our goal
To be able to write code in the host, in our VS IDE and when we’ll debug it, it will run inside the VM allowing us to debug the application from VS as we would if the application was running in our on PC
Let’s start with the VM itself:
We’ll want to copy files from the host to the guest. To do that we need to configure both to be in the same network.
In VMware Workstation, open the VM settings and look at the “Network adapter” internal settings, make sure they look like this:

We want to set the network connection to Host-only. This way we are creating a private network between the host and the guest. Select the virtual network from the list that has “(Host-only)” in it.
Now let’s configure the IPs
In the host:
Press WinKey+R and type: ncpa.cpl, press OK. The network connections panel will open to show you the different network adapters you have. One of them should be called “VMnet1” (or the same as was called in the list for you). Right click on it, click on Properties and double click on “Internet Protocol Version 4 (TCP/IPv4)”. You can set whatever IP you want, mine looks like this:

Press OK multiple times until all the windows close.
Let’s set up the VM’s IP
Navigate inside the VM to the network connections panel like we did in the host (WinKey+R -> ncpa.cpl) you should see a network adapter called “Ethernet0”. Open it’s properties and set the IP like in the host but with a different number at the end:

Firewall
In order to continue we need to open some ports in the Firewall inside the VM. Or, understanding the VM is inside a private network with the host, we’ll just disable the Firewall in the VM. Inside the VM navigate to “Windows Defender Firewall” and click on “Turn Windows Defender Firewall On or Off” at the left panel. Turn off Windows Defender Firewall for both networks (“Public” and “Private”).
Let’s check we did everything right!
Open a command line in the host and ping the guest:
Ping 100.100.100.2If you receive correct responses that means we have a connection to the VM! (If not, you might have not configure the firewall or the IP correctly, double check 🙂 )
Visual Studio:
Run Visual Studio.
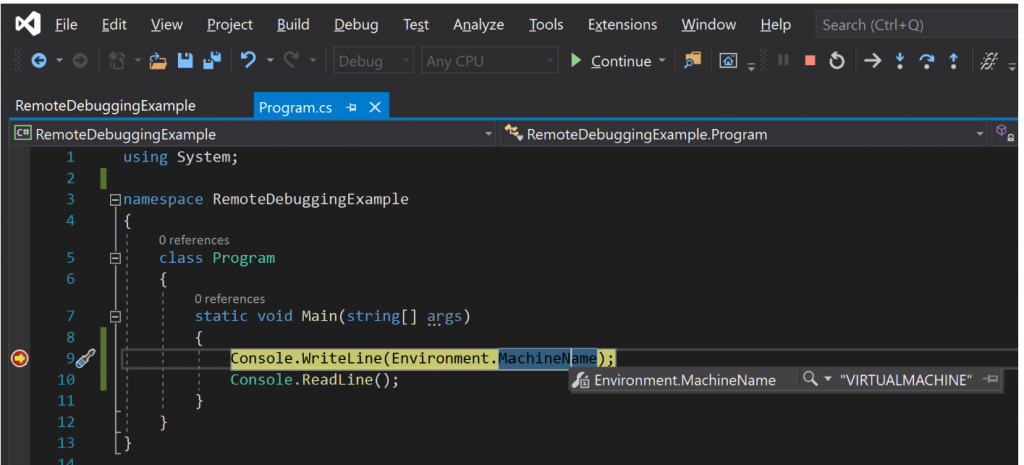
I’ve prepared a simple console application to demonstrate the ease of use of remote debugging, you can clone it from GitHub
This console application will print to the console the Hostname of the computer it is running from. It is a simple way of understanding how easy it is to run the application in another computer and see how powerful it is.

Setup Post-Build
This step is really helpful, we’ll set up a post-build that will copy the software inside the VM so when we debug the code, we know it’s always the last version.
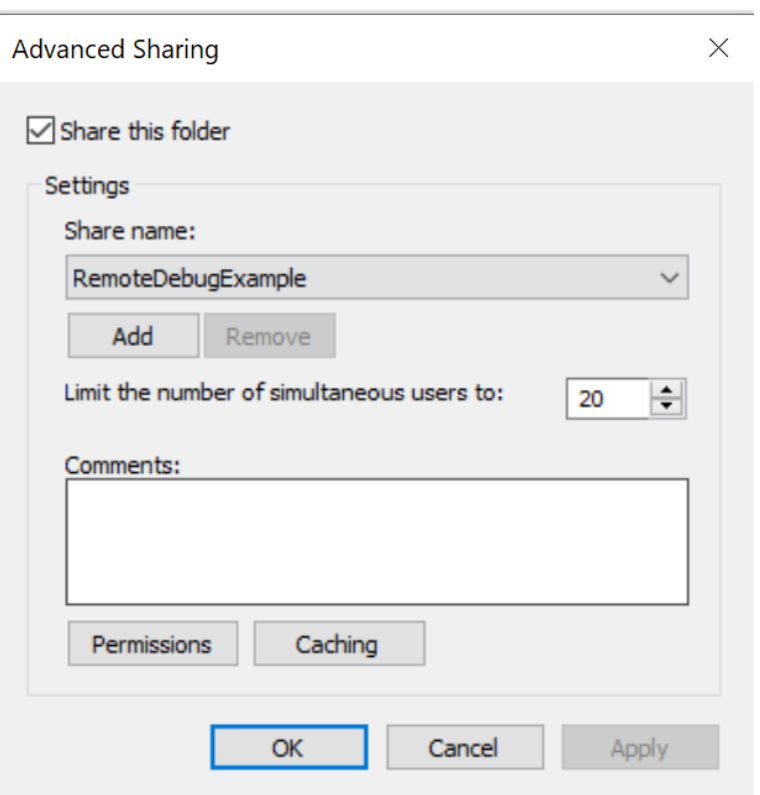
Inside the VM, create a folder under C:\ drive, call it anything you want and set it to be shared:
- Right click the folder -> Properties
- Inside the “Share” tab, click on “Advanced Sharing”
- Mark the “Share this folder” checkbox
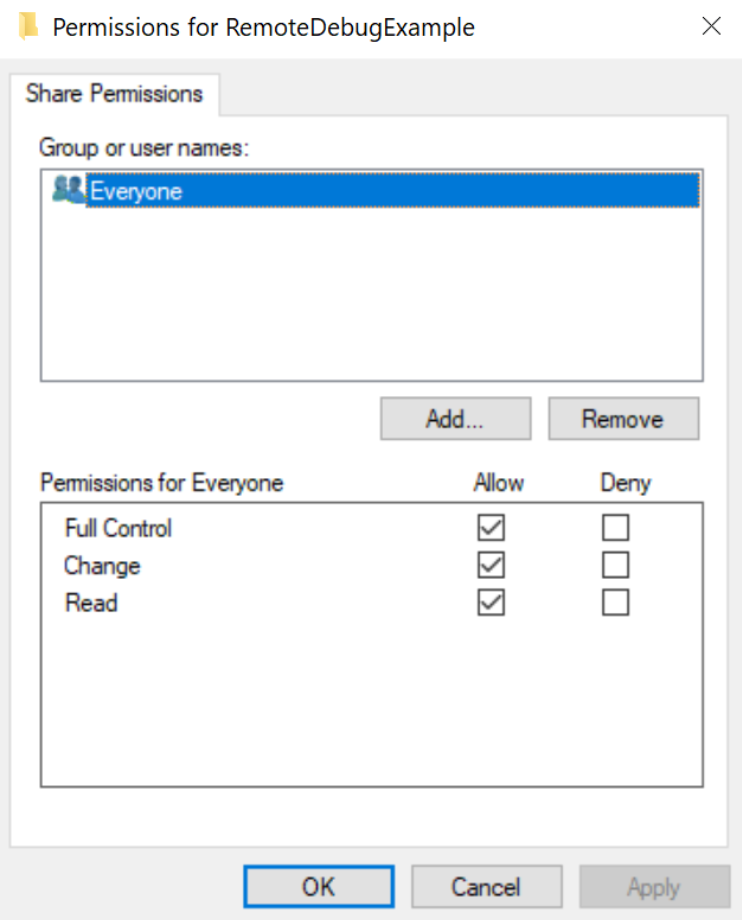
- Enter “Permissions” and set it to be like in the picture
In the host, navigate to “\\100.100.100.2\”. A login dialog will appear, enter the credentials to login to the VM and you should see the folder you created:
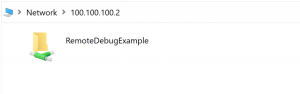
When we enter the folder for the first time, we create a “Credential” in Windows that will allow us to re-enter the folder in the future without the need to login to the VM each time.
Let’s get back to Visual Studio and set up the Post-Build
Right click your main project and go to properties.
Choose “Build events” in the left menu.
In the Post Build textbox enter this:
xcopy $(TargetDir) \\100.100.100.2\RemoteDebugExample /E /YThis command will copy all the files and folders from the $(TargetDir) macro (will be expanded to your build output folder) to your VM folder. Now if you Build the project, you’ll see the files inside the shared directory!
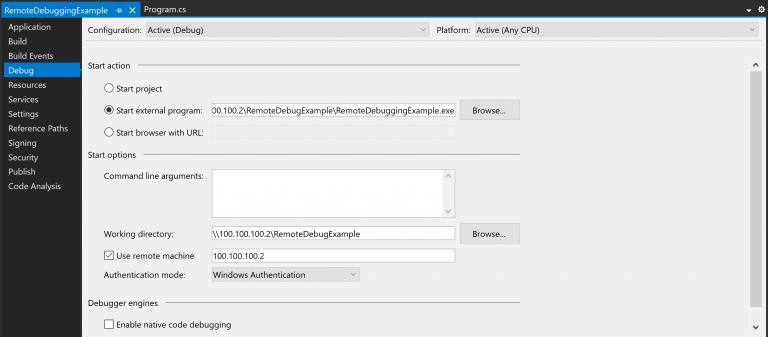
The next step is to set up Visual Studio to run the executable in the remote machine instead of the local one:
Right click your main project and go to properties.
Then choose “Debug” in the left menu.
Start Action: Start external program and fill the textbox with the location of the exe file inside the VM, it should look something like “\\100.100.100.2\RemoteDebugExample\RemoteDebuggingExample.exe”
Start Options:
- Insert the shared folder in Working Directory (\\100.100.100.2\RemoteDebugExample\)
- Check “Use remote machine” and enter the IP of the VM (100.100.100.2)
Configure “Remote Debugger” inside the VM
In the host, navigate to your Visual Studio installation folder; mine is at C:\Program Files (x86)\Microsoft Visual Studio\2019\Community
Enter “Common7” and then “IDE”.
Copy the folder “Remote Debugger” to the VM. You’ll be able to just ctrl+c the folder in the host and ctrl+v it inside the VM.
Inside “Remote Debugger” you’ll find two (relevant) folders; x86, x64. Enter the right one according to the OS architecture running on the VM.
You’ll find an executable named msvsmon.exe, this executable allows Visual Studio to connect to the computer and run and attach to executables.
PRO TIP: Add a shortcut to msvsmon.exe in the Startup folder so it will run automatically each time you boot the VM. You can access the Startup folder by typing shell:startup in the Run dialog.
Play time!
Make sure msvsmon.exe is running in the VM and press F5 to run!
(The first time you’ll run, you’ll need to enter the login credentials to the VM)
Now we can debug the application from the host whilst running from the VM:
That’s it!
Encounter any problems? Write a comment and I’ll try to help!
No Comments