Introduction
Now that your Raspberry Pi is up and running, it’s time to get hands-on with electronics! In this guide, we’ll connect an LED and a button to the Raspberry Pi’s GPIO pins, then write a Python script that turns the LED on and off when you press the button.
What You’ll Need
Raspberry Pi (set up with SSH from Part 1)
Breadboard (optional if you have multi-use connectors)
1x LED
1x Button
2x 330Ω resistors
Optional, as we are using a small LED and button there shouldn’t be any issue.
However they are recommended to make the circuit more stable, here are the color bands needed:
- 220: Red-Red-Brown-Gold
- 330: Orange-Orange-Brown-Gold
Jumper wires
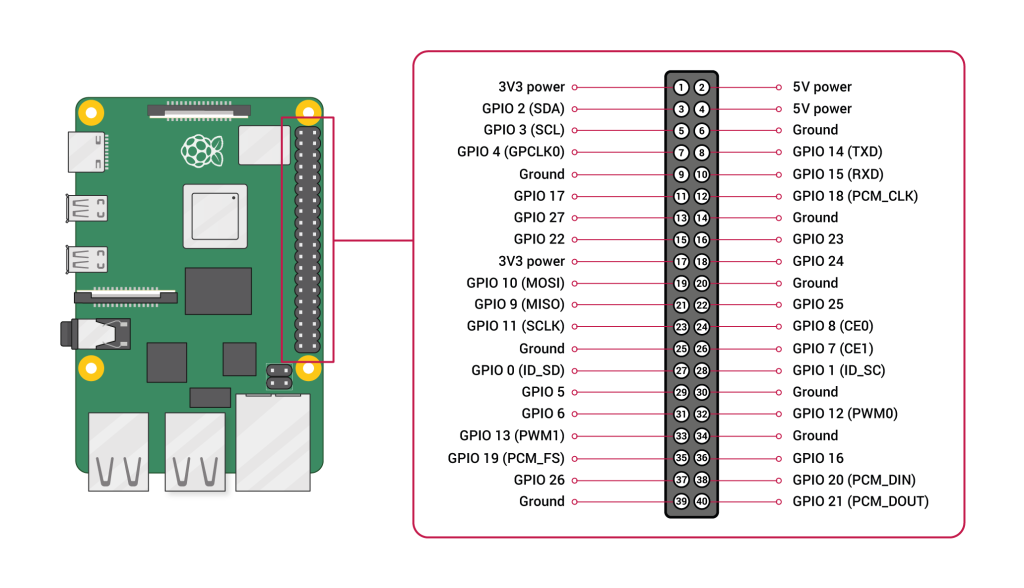
GPIO (General Purpose Input/Output)
These are the pins on a Raspberry Pi that let you connect and control electronic components like LEDs, buttons, sensors, and motors.
They can be programmed to act as inputs (to read signals, like a button press) or outputs (to send signals, like turning on an LED).
Wiring Diagram
Here’s how to connect things:
Connect the LED:
Long leg → GPIO 18 (pin 12)
Short leg → resistor → GND (pin 5 for example)
Pay attention to the leg hight as the direction is important!
Connect the Button:
One side → GPIO 23 (pin 16)
Other side → resistor → GND (pin 14 for example)
This way, pressing the button pulls the GPIO pin low.
Here is a diagram including our connections:
(1) 3.3V    ┌─┐ 5V (2)
(3) GPIO2   │ │ 5V (4)
(5) GPIO3   │ │ GND * (6) <- [330Ω] <- LED (short leg)
(7) GPIO4   │ │ GPIO14 (8)
(9) GND     │ │ GPIO15 (10)
(11) GPIO17 │ │ GPIO18 (12) *── LED (long leg)
(13) GPIO27 │ │ GND (14) *── [330Ω] <- Button
(15) GPIO22 │ │ GPIO23 (16) *── Button
(17) 3.3V   │ │ GPIO24 (18)
(19) GPIO10 │ │ GND (20)
(21) GPIO9  │ │ GPIO25 (22)
(23) GPIO11 │ │ GPIO8 (24)
(25) GND    │ │ GPIO7 (26)
(27) GPIO0  │ │ GPIO1 (28)
(29) GPIO5  │ │ GND (30)
(31) GPIO6  │ │ GPIO12 (32)
(33) GPIO13 │ │ GND (34)
(35) GPIO19 │ │ GPIO16 (36)
(37) GPIO26 │ │ GPIO20 (38)
(39) GND    │ │ GPIO21 (40)
            └─┘
Write the Python Code
SSH into your Pi and create a file:
nano led_button.py
Paste this code:
import RPi.GPIO as GPIO
import time
# Pin setup
LED_PIN = 18
BUTTON_PIN = 23
GPIO.setmode(GPIO.BCM)
GPIO.setup(LED_PIN, GPIO.OUT)
GPIO.setup(BUTTON_PIN, GPIO.IN, pull_up_down=GPIO.PUD_UP)
print("Press the button to toggle the LED. Press Ctrl+C to exit.")
try:
    while True:
        button_state = GPIO.input(BUTTON_PIN)
        if button_state == GPIO.LOW:  # Button pressed
            GPIO.output(LED_PIN, GPIO.HIGH)
        else:
            GPIO.output(LED_PIN, GPIO.LOW)
        time.sleep(0.1)
except KeyboardInterrupt:
    print("Exiting program...")
finally:
    GPIO.cleanup()
Save and exit (CTRL+X, then Y, then Enter)
Run the Script
In your terminal:
python3 led_button.py
Now press the button — your LED should light up when pressed and turn off when released.
Experiment
Change the GPIO pin numbers.
Make the LED toggle on/off with each press instead of holding.
Add multiple LEDs for fun.
Conclusion
You just built your first Raspberry Pi hardware project:
controlling an LED with a button using Python!
This is the foundation for countless DIY electronics projects — from building a mini game console to automating your home.
Feel free to ask any questions and comment on your own projects!
No Comments